Create a new character as an addition Gotei 13 team my own Shinigami fully modeled, rigged and animated with backgrounds and all. My character will be female of course.
another hollowfied shinigami. something cute on her head
Tuesday, September 30, 2008
Saturday, September 27, 2008
I've been lazy .. Mon-Fri I can't get my act together and get work done. Anyways Friday afternoon it was ZOMG its weekend and I didnt' get anythign done. Then went on a 8 hour work session with Maya. I spent more time getting stuck and redoing than learning but i guess it was a learning experience.
hollow mask I still have only the base drawing and not exactly sure how to shape it in polygons as i needed more vertexs at first ..but now i've too many because it's tedious to move so many dots 1 by 1. Anyways 15 draft files used and still nothing useable. So back to the books for me .. that sounds like I need more learnings.
Today: polygon attempt on ichigo hollow. tommorow will hit the books and try it again with subdivisions and nurbs .. cuz polygon is NOT friendly to poking pushing stuffs.
-kk i'm off .. need to do Math h.w
Wednesday, September 24, 2008

Tuesday, September 23, 2008
Ebay is Dead
So an off topic rant on Ebay. I've not used ebay in over a year and recently tried to create a seller account to get rid of some of my practice artworks and maybe pick up a small fan base. 5 tries and it still gives the same error, email thier tech support they take 3 days to give a canned response we're having technical difficulties and are working on it. Live help same thing. ok WTF it does not take 4-6 months to fix stuff. If i took 4 months to fix any problem i'd have been been fired. This sounds alot like they're procrastinating and trying to stall for time until the company folds but in the mean time continue to rake in as many fees as they can.
New sellers unable to register should be a problem because they bring in fees, and more goods BUT i suspect this gibberish is just a fancy "your acct has been infinetely suspended from some unknown transgression as a seller but you can still come spend your monies on us." No thx.
Secure Connection Failed
scgi.express.ebay.com uses an invalid security certificate.
The certificate is only valid for the following names:
giftcertificates.ebay.com , spages.half.ebay.com
(Error code: ssl_error_bad_cert_domain)
Which if i tell my browser to accept the invalid certificate it brings
me to another broken link says, "page not found"
WTF according to google they've been having this problem since May 2008 my email was sent sept 20, 2008. Google reports: Results 1 - 10 of about 206,000 for "seller" "account" "problem" "ebay".
ALTERNATIVES TO EBAY:
www.amazon.com
www.etsy.com
www.yourwebsite.com
there are more but i dont know them off the top of my head. Really WTF I need to jump through hoops when i'm the client? if it's this hard to try and list something wouldn't i find another way to sell it? you bet i am. ANYWAYS thanks for listening I'm done ranting.
=======================
UPDATE! ebay finally fixed their seller account creation problem. 10/18/08 like 6 months after the first postings .. sheesh! i personally filed 3+ tickets on the same issue. not like i'm a super seller but i have a few items that would sell for xmas anyways i just like to know the option is there.
Saturday, September 13, 2008
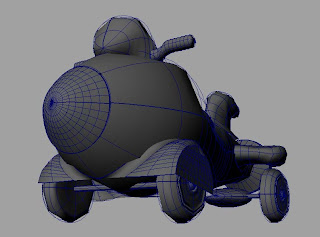
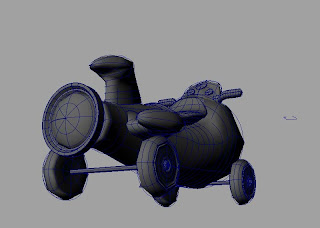
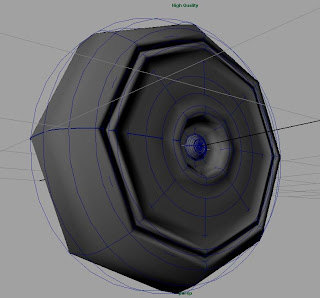
Completed: Nurbs Red Rocket
Software: Maya 2008
Subject: Red Rocket - Nurbs Modeling
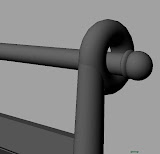
I perfected the nice smooth wheel bump which is a profile curve and lofting.
Issues: (solved) Stitching Nurb Edges -- Maya kept crashing and giving me the Fatal Error. Attempting to save to C://xyx. I tried a few things upgraded video card driver, then created a simple sphere and lofted some surfaces and tried just about every combo out there to stich and see if it crashes or not. It's not like i can skip the stiching tool because to manually move vertexes would be a nightmare.
Solution: upgrade videocard driver. All stuffs being stictched must meet these criteria: all NURBS, curves that is entirely of one type either profile or regular but not a mix. Maybe number of loft span should equal the span amount being stitched.

Subject: Red Rocket - Nurbs Modeling
I perfected the nice smooth wheel bump which is a profile curve and lofting.
Issues: (solved) Stitching Nurb Edges -- Maya kept crashing and giving me the Fatal Error. Attempting to save to C://xyx. I tried a few things upgraded video card driver, then created a simple sphere and lofted some surfaces and tried just about every combo out there to stich and see if it crashes or not. It's not like i can skip the stiching tool because to manually move vertexes would be a nightmare.
Solution: upgrade videocard driver. All stuffs being stictched must meet these criteria: all NURBS, curves that is entirely of one type either profile or regular but not a mix. Maybe number of loft span should equal the span amount being stitched.


Friday, September 12, 2008
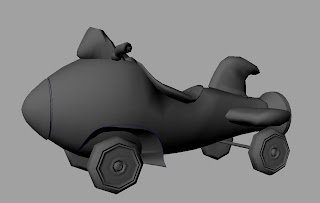
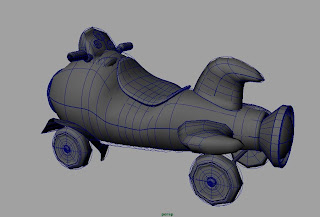
Nurbs Modeling: Red Rocket
Software: Maya 2008
Subject: Nurbs Modeling - Red Rocket
Lesson: Editing nurbs sufrace, project curve on surface, trimp and untrim surfaces, attach surfaces, detach surfaces, insert isoparms.
Issues .. lol like everything. There were a few small discreptancies between the book and what i needed. Ex. Book would say front view while all i had to work with was top and side views or it would say on Y axis and clearly that can't be right. Also there were a few places where the book said use 6 spans in a sphere while i counted thier example and it was more like 16 spans.
Issue #2 i'm still having trouble with the wheel cover .. my curve isn't working so will continue work on the cover but otherwise this is at 95% completion.
Time: 2 days


Thursday, September 11, 2008
Maya: Keyboard Short Cuts
Hi hi,
Okies this is particular post is both for my own convenience and sanity. I use this shortcut menu to figure out how to get my menus back because I accidentally press enough keys to lose my UI, menu bar, more UI parts .. and then have to spend time googling for help to get it back. This is one of those really basic problems that is so low that you won't find it in any helpfile yet its important just the same.
---------------------------------------
May 16 2008
Maya keyboard shortcuts
Published by admin at 5:47 pm under 3D Modeling, Maya, Technology, productivity, software
To verify or change any of the following shortcuts in Autodesk Maya (8.5 and 2008):
Window -> Settings / Preferences -> Hotkey Editor
SNAPPING OPERATIONS
c Snap to curves
x Snap to grids
v Snap to points
j Move, Rotate, Scale Tool snapping
Shft+J Move, Rotate, Scale Tool relative snapping
PAINTING OPERATIONS
Alt+f Flood with the current value
Alt+a Turn Show Wireframe on/off
Alt+c Turn Color Feedback on/off
Alt+r Toggle Reflection on/off
u+LMB Artisan Paint Operation marking menu
b Modify upper brush radius
Shft+B Modify lower brush radius
Ctrl+b Edit Paint Effects template brush settings
i Modify Artisan brush Stamp Depth
m Modify Max Displacement (Of Sculpt Surfaces and Sculpt Polygons Tool)
n Modify Value
/ Switch to pick colour mode
‘ Select cluster mode (Of Paint Weights Tool )
8 Open Paint Effects panel
o+LMB Poly Brush Tool marking menu
o+MMB Poly UV Tool marking menu
TUMBLE, TRACK or DOLLY
Alt+LMB Tumble Tool
Alt+MMB Track Tool
Alt+RMB Dolly Tool
DISPLAY
4 Shading > Wireframe
5 Shaded display
6 Shaded and Textured display
7 Lighting > Use All Lights
d+LMB Display Quality marking menu
1 Low Quality Display setting
2 Medium Quality Display setting
3 High Quality Display settin
DISPLAYING OBJECTS (show, hide)
Ctrl+h Display > Hide > Hide Selection
Ctrl+Shft+H Display > Show > Show Last Hidden
Alt+h Display > Hide > Hide Unselected Objects
Shft+I Show > Isolate Select > View Selected
TOOL OPERATIONS
Return Complete current tool
~ Abort current tool
Insert Enter tool Edit mode
Shft menu+Q Select Tool
Shft menu+Q+LMB Component marking
Alt+q Select tool
Alt+q+LMB Polygon marking menu
q+LMB Mask marking menu
w Move tool
w+LMB Move tool marking menu
e Rotate tool
e+LMB Rotate tool marking menu
r Scale tool
r+LMB Scale tool marking menu
t Show manipulator tool
y Select last used tool (Excluding Select, Move, Rotate and Scale)
j Snap Move, Rotate, Scale tool
= or + Increase manipulator size
- Decrease manipulator size
ANIMATION OPERATIONS
s Animate > Set key
i Insert Keys tool (for graph editor)
Shft+S+LMB Keyframe marking menu
Shft+S+MMB Tangent marking menu
Shft+E Set key for Rotate
Shft+R Ser key for Scale
Shft+W Set key for Translate
Alt+s Cycle handle sticky state (for IK handles)
PLAYBACK CONTROLS
Alt+. Move forward one frame
Alt+, Move backward one frame
. Go to Next key
, Go to previous key
Alt+v Turn Playback on/off
Alt+Shft+v Go to Min Frame
HOTBOX DISPLAY
Space Hotbox
Alt+m Default Hotbox Style (Zones and Menus Rows)
WINDOW AND VIEW OPERATIONS
Crtl+a Toogle Attribute Editor and Channel Box
a Frame all in active panel
a+LMB History Operations marking menu
Shft+A Frame All in all views
f Frame selected in active panel
Shft+F Frame selected in all views
] Redo view change
[ Undo view change
` Set keyboard focus to command line
Alt+` Set keyboard focus to numeric input line
F1 Help > Contents and Search
MOVING SELECTED OBJECTS
Alt+Up arrow Move up one pixel
Alt+Down arrow Move down one pixel
Alt+Left arrow Move left one pixel
Alt+Right arrow Move right one pixel
TRAVERSING THE HIERARCHY
Up arrow Walk up the current hierarchy
Down arrow Walk down current hierarchy
Left arrow Walk left current hierarchy
Right arrow Walk right current hierarchy
MODELING OPERATIONS
Crtl+Up arrow Display coarser Sub-d level
Crtl+Down arrow Select/refine Sub-d component
Crtl+F9 Convert poly selection to Vertices
Crtl+F10 Convert poly selction to Edges
Crtl+F11 Covert poly selection to Faces
Crtl+F12 Convert poly selction to UVs
FILE OPERATIONS
Ctrl+n File > New Scene
Ctrl+o File > Open Scene
Ctrl+s File > Save Scene
Ctrl+q File > Exit
SELECTING MENUS
Ctrl+m Show/Hide main menu bar
Shft+m Show/Hide panel menu bar
h+LMB Menu Set marking menu
F2 Show Animation menu set
F3 Show Modeling menu set
F4 Show Dynamics menu set
F5 Show Rendering menu set
EDIT OPERATIONS
z or Ctrl+z Edit > Undo
Shft+z Edit > Redo
g Edit > Repeat
Shft+G Repeat command at mouse position
Ctrl+d Edit > Duplicate
Shft+D Edit > Duplicate with Transform
Crtl+g Edit > Group
p Edit > Parent
Shft+P Edit > Unparent
Crtl+x Edit > Cut
Crtl+c Edit > Copy
Ctrl+v Edit > Paste
SELECTING OBJECTS AND COMPONENTS
F8 Switching between Object and Component Editing
F9 Select Polygon and Subdivision Surface Vertices
F10 Select Polygon and Subdivision Surface Edges
F11 Select Polygon and Subdivision Surface Faces
F12 Select Polygon and Subdivision Surface UVs
Ctrl+i Select next intermediate object
Alt+F9 Select Polygon Vertex/Faces
<> Grow polygon selection region
Tuesday, September 9, 2008
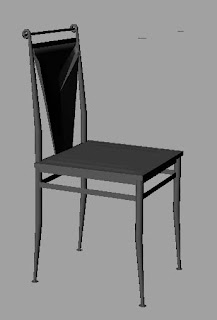
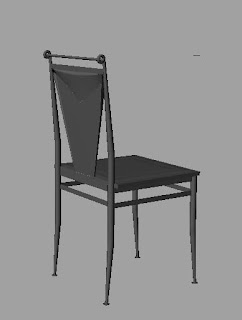
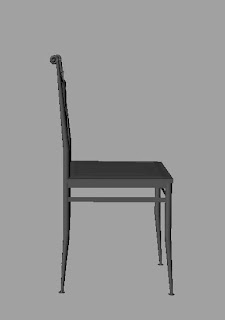
Chair Modeling -- freehand
Software: maya 2008
Subject: chair
here's my first free hand modeling of a chair. the original is the one in color. Granted there are still problem issues like why can't i apply textures and colors. Sheesh this is one very uncomfortable looking chair oh and it's really small .. like 2x2 inches. I forgot about sizing and started working with the default 1x1 inch cube instead of making it bigger. I only noticed it when i was trying to stretch something and the compy kept pulling too hard.


Saturday, September 6, 2008
Choochoo Train 90% Completed
Software: Maya 2008
Subject: modeling Polygons
Issues: missing the wheel pushing slabs - I got tired so leaving that for another time.
Time: 5 hours


Subject: modeling Polygons
Issues: missing the wheel pushing slabs - I got tired so leaving that for another time.
Time: 5 hours


Choo Choo Train!
Software: maya 2008
Suject: Train modeling round 2
Issues: None its just very time consuming 5-7 hours this took. and it's 1/2 way done as there's still the engine and wheels to go with it.


Suject: Train modeling round 2
Issues: None its just very time consuming 5-7 hours this took. and it's 1/2 way done as there's still the engine and wheels to go with it.


Thursday, September 4, 2008
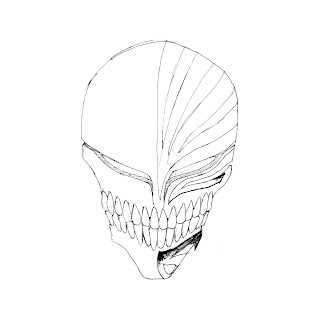
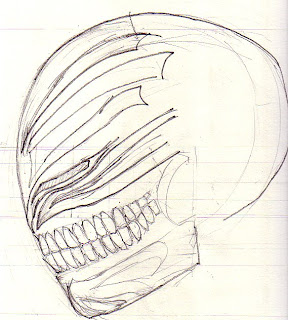
Project: Hollow Mask (day 1)
mayaSubject: 3D polygon model of Ichigo's Hollow Mask
Software: Maya 2008 and Photoshop CS3
Issues: many .. from drawing to modeling
Drawing: Traced from source images.
I will be posting a daily progress update on project "Hollow Mask" is taking place. (ON HOLD)
-- I'm holding off this project until i've completed more studies because i lose too much time tryign to figure stuff out.
These are black and white line drawing .. I admit to tracing them because in 6-12 months of not drawing much my skills have atrophied so I can't draw on demand. I drew for a good 3 hours trying various ways of duplicating the mask in side view. Zah more practice needed.
The ugly one is my free hand drawing so after a few false starts, bad results, and soso results it occurred to me to go speed watch some bleach looking for a decent side view of the ichigo mask. and I did find some after a few minuets lol i got caught up rewatching some anime vs. getting reference materials but who could resist? it was so temping. Ok then next it was save, cut off background clean it up a bit print it out, on 8x11 paper, put under light box, trace onto good drawing paper, rescan back into digital form.. and let the modeling begin.
Problem: front view and sideviews do not match up exactly. Maya software requires that side and front views match exactly inorder to do its magic so i will be making a mask from only 1 view. I'm just about out of ideas on how to make it match up. The short answer fiddle with it on photoshop a little nip and tuck a few recontructions and walla they're sort of similar. Long answer go retrain drawing skills.
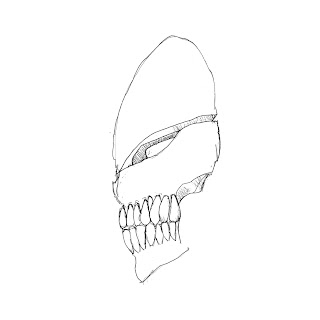
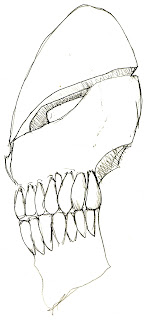
These bottom pictures are my drafts which I did not use because they dont look close enough to the front view. Btw all are traced sorry i can't demonstrate my drawing skills just yet lol its laughable I'd say.


New project: Bleach 3D Hollow Mask
Hi hi ,
I came up with some fun projects to do while going through yet more books on Maya and photoshop.
1.) Create a 3D model of Ichigo's Hollow Mask (from the Bleach anime series). For halloween I may make a real hollow mask from paper mache depending on how comfortable I am with clay as I've never modeled anything before. Hehe if I succeed i'm going to make a few of them as gifts !
2.) Create a new character as an addition Gotei 13 team my own Shinigami fully modeled, rigged and animated with backgrounds and all. My character will be female of course.
Oo this is going to be so much fun and lots of hard work. I want good results! Anyways there's alot of stuff i dont know so .. this would be an interesting way to learn and have fun at the same time.
Okies!
Wednesday, September 3, 2008
Maya Expressions (chapter 12)
Hihi,
so yah i've been slacking off but zomg it was labor day weekend!! who doesn't? ok its an excuse but this part is a bit dry and very confusing. Ok to show you what i mean by dry & confusing
The color red is gotten from this gibberish:
BubblesShape.rgbPP = <<1,0,0>>;
random colors flickering at every 1 second is:
BubblesShape.rgbPP = sphrand(1);
OR perhaps this is to your taste:
Ball.scaleY = time/2 + 1;
Drum.scaleX = time + 1;
Drum.scaleY = time + 1;
Translation: Ball's Y vaules "Length" is equaled to the frame's time divided by 2 plus 1. So at frame 4 this ball will have a length of 3 (frame 4/2+1)as a size. While at the same time Drum's X (width) Drum Y (length) vaules will be equaled to frame time 3 + 1. so 4.
Actually this shorthand of an expression is very efficient why write more than you need to?
Questions: RGB colors? .. eh what numbers = what colors? it would be nice to know. So a sphrand is this math thingy that assigns a random color to each partical .. okies what other math formulas are built in and what do they look like cuz i dont think sphrands alone will cut it.
Upside is that this is chapter 12 out of 13 .. so i know hold basic beginner's knowledge in my head. awesome.. and now to put it to good use. lol hit up the real books now that i got through the pdf tutorial


Subscribe to:
Posts (Atom)

